Image Map
Showing posts with label recipes. Show all posts

Friday, March 27, 2015

Fun Food Facts A-Z | C is for Cantaloupe + Recipe

Welcome to another Fun Food Facts A-Z! This week's letter is C! C is for...Cantaloupe! 

I have to admit I don't really like cantaloupe.  The only way that I do like cantaloupe is cantaloupe ice cream! My Grammy would make it every summer! Cantaloupe ice cream has a refreshing taste that is perfect for summer. With summer on my brain I can't stop thinking about all the summer food's I love. I will have to give my Grammy's cantaloupe ice cream recipe a try this summer! Be sure to pin the recipe so that you too can make this awesome ice cream! Now on to the fun facts!


Fun Food Facts:

  • Cantaloupe was first grown in the Nile River Valley of Egypt.
  • In the US sometimes Cantaloupe can be called muskmelon.
  • Cantaloupe peaks in the summer.
  • Cantaloupe does not ripen after you cut it off the vine.
  • Store Cantaloupe at room temperature for no more then four days.
  • Cantaloupes are related to cucumbers.
  • Cantaloupes are packed with vitamins A & C.
  • When shopping for Cantaloupe it is best to choice the one with the sweetest smell.

Next week's letter is D....what fun food starting with D would you like to learn about?

Ingredients:
1 1/2 cups small diced Cantaloupe
2 1/4 cups Milk
1/2 cup Sugar
1 1/2 teaspoon Vanilla
Pinch of Salt
Direction:
  1. Dice Cantaloupe and keep the juices.
  2. Mix milk, sugar, vanilla and salt, until the sugar has dissolved.
  3. Now add your cantaloupe with the juices to your milk and sugar mixture.
  4. Put the mixture in the Fridge for 1 hour.
  5. Pour your chilled mixture into a 2 qt. ice cream makers and let mix for 15 minutes.


Monday, March 16, 2015

Motivate ME Monday!~ Strawberry ShortCake Cookies


 So everyone seems to be really excited for spring. I' am too, but I'am more excited for the SUMMER! I'd be happy if we skipped spring all together! There are so many great things about summer; warm weather, the beach, flip flops and strawberries! Mmmm! Strawberry season is a big deal where I live. We have the Pungo Strawberry festival and during the season you can go to any farm and pick them fresh yourself. Strawberry pick'in is one of my favorite things to do in the summer!

Did you see my behind the scene photo shoot? These pics are from that shoot! 

I've been craving summer and summer foods. I was in the kitchen last weekend trying to figure out what I could make that would help curve my summer craving. Luckily I had frozen strawberries that I picked from the summer before! The first thing that came to my mind was Strawberry Shortcake. 


I have my grandmother's recipe for Strawberry Shortcake and I thought I was going to do that at first, but then I remember this recipe that I had clipped from Epicurious. I love the classic cake, but these cookies seemed so much quicker to make! Baking is not my skill in the kitchen. I am always trying to improve. I can honestly say this is the first time I have even baked cookies and they all came out perfect and golden! I am so proud of myself. I just wish I knew what I did differently. These cookies not only came out looking delicious they are delicious! They only keep for a day or two, but they are so good with tea in the morning! And it's OK to eat cookies in the morning as long as they have fruit in them. ( and the kids don't see you..LOL) I can't wait to make these cookies this summer with my fresh picked strawberries!

Summer is coming, are you ready? Whats your favorite thing about summer?

Ingredients:
2 cups diced Strawberries
1 teaspoon Lemon Juice
1/2 cup Sugar
2 cups Flour
2 teaspoons Baking Powder
1/2 teaspoon Salt
6 tbsp unsalted cold Butter
2/3 cup Heavy Cream

Directions:
  1. Preheat your oven to 375 degrees. 
  2. Take your strawberries and coat them with about 1 tbsp of butter, 1 tbsp sugar and 1 teaspoon lemon juice.
  3. Mix together flour, baking powder, salt and sugar.
  4. Cut the butter into pieces and with your fingers rub it into the dry mixture until coarse crumbles.
  5. Now stir in your cream and strawberry mixture.
  6. Line your baking sheets with parchment paper and drop cookies about 2 in apart. Decorate if desired and bake for 25 mins.
  7. Allow to cool on rack. Serve right away and store in an air tight container. 

This post has been featured on:
Diana-Rambles

Wednesday, March 11, 2015

Fun Food Facts A-Z | B is for...Broccoli

 I love to learn! I especially love learning about food. Last week I was exploring around the internet and learned some pretty cool things about artichokes and decided to share in a blog post. (Missed that post don't worry just click here!) Since I love learning and blogging I am going to combine the two each week. Fun Food Facts A-Z will highlight a fruit or vegetable each week. You will learn new fun facts and maybe even a recipe. 
Welcome to Fun Food Facts A-Z!
This week's letter: B..... is for Broccoli


Fun Facts:

  • Broccoli as been eaten since the 6th century.
  • The average American eats 4 lbs of Broccoli a year.
  • Broccoli means "branch" or "arm".
  • California produces 90% of the US Broccoli.
  • Thomas Jefferson loved Broccoli! He used seeds from Italy to plant in Monticello. 
  • Broccoli is high in vitamin A and Fiber.
  • Fresh Broccoli will have dark green heads. 
  • Try to stay away from stalks that bend or feel rubbery.

My family and I eat broccoli all the time! I always have it in my crisper or on my grocery list. Here is a quick and easy recipe that everyone will love.

Ingredients:
3 medium size Broccoli heads
1 tbsp of chopped Garlic
1 teaspoon of Lemon Pepper
2 tbsp Olive Oil
Dash of Salt
Direction:
  1. Preheat oven to 350.
  2. Rinse the broccoli and cut into florets.
  3. Add your broccoli and all the ingredients to a plastic bag and give it a few good shakes.
  4. On a lined baking pan spread out the broccoli and bake for 25-30 minutes or until the broccoli is crisp.


Sunday, March 8, 2015

Motivate ME Monday!~ Asian Pork Meatballs


I always have homemade meatballs in my freezer. They are super easy to make and take no time at all. Meatballs in the freezer can be very handy when you wanna add a protein to a quick work night pasta and salad dinner.  I throw my meatballs in with the sauce while it is cooking to reheat them or flash them in a hot pan.


 When I make meatballs I normally make an Italian style. I like to use turkey and pork in my meatballs, but meatballs made with venison are my favorite. When I saw a recipe for Asian Chicken Meatballs in Food and Wine, I thought WOW, I wish I had some ground venison! I thought these would be even better made with venison, but I don't have any venison and it can be expensive at a butcher shop. Guess I will have to wait for deer season and my dad good shot.


Last Saturday I was bored and in the kitchen and decided to make these meatballs. I only had ground pork in my freezer, but I like to use what I have so instead of running out and buying chicken I used the pork. These were a huge hit! I had saved a few so that I could photograph them and my Hubby asked me everyday if he could eat them yet. Normally I just throw meatballs in my sauce for pasta, but the Asian flavors of these meatballs would not mix well with the Italian flavors of the sauce. I made my own mix-up of sweet and sour and Sriracha and served the meatballs with rice and Asian veggies! These were so good that my family ate them all before I could freeze any, but they are already requesting them again so I am sure that some will be in my freezer shortly!

Did you notice anything new about my photos? I've been learning  a lot about photography lately and wanted to try my hand at making a watermark for my photos! Do you watermark your photos?  How do you like mine?

Ingredients
1 lb ground Pork
1/2 cup Plain Bread Crumbs 
1/3 cup minced Scallions
3 tbsp minced Ginger
1 tbsp minced Garlic
2 Teaspoons Sesame Oil
2 Teaspoons Soy Sauce
1 egg
S & P
Directions
 1. In a large bowl mix all your ingredients.
2. Form into meatballs.
3. Bake at 450 on prepared baking sheets for 13 minutes.  Serve right away or wrap in parchment to freeze.

* For the dipping sauce I already had a jar of sweet and sour, so I add Sriracha to taste. It came out perfect! 


Have you checked out Always Savory Facebook page or Always Savory Pinterest Board? If not stop on by and give us a like and follow please and thank you!

Monday, March 2, 2015

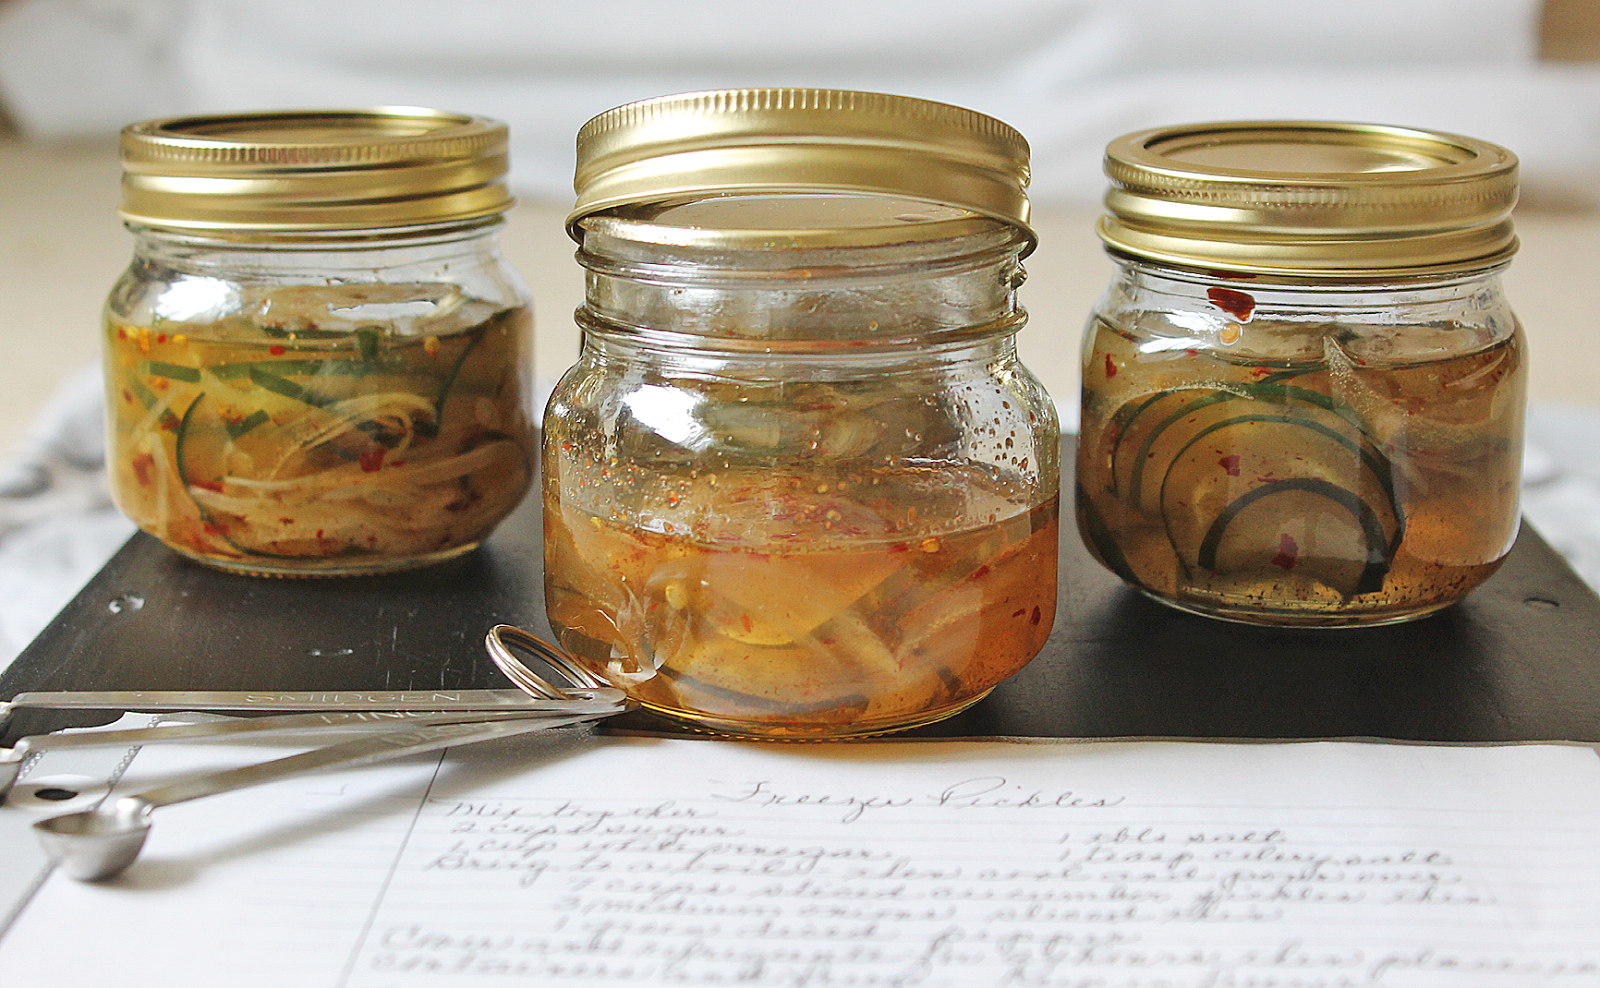
Motivate ME Monday!~ Grammy's Freezer Pickles


My grandmother was always canning! Her basement shelves were full of veggies from her garden and sauces she canned. I remember her doing this, but in all the years of memories not one of them are of me helping her.


Looking back now I wish that I had  gotten to help my Grammy. Grammy is now 93 years old and doing great,(she lives by herself and still drives!) but gardening and canning are not something she gets to do anymore. She does still cook on some occasions! And when she cooks everyone shows up for dinner! I like helping her in the kitchen. Sometimes she can be a kitchen control freak, but she is 93 so I listen.


A few years back Grammy wrote out all of our family's favorite recipes and made copies for everyone. Each cookbook came with a personal letter in the front and these cute little smidgen,pinch,dash spoons.( I love Grammy's handwriting. So neat and perfect. They don't teach cursive like that anymore in school!)I plan on keeping the cookbook going and adding my own recipes so that I can hand it down to my daughter someday. 


This past summer I thought that I would can some fresh veggies from my local farmer's market. The only problem was I didn't have any canning supplies and I had no idea what I was doing.  So I go to Grammy's cookbook and there was nothing in there about canning veggies. I called Grammy for some advice and I shopped around for canning supplies. After realizing that canning supplies can be costly and that canning was a lot more involved I settled for this freezer pickle recipe that was in Grammy's cookbook.


I am so happy with how my freezer pickles turned out. They taste exactly how Grammy makes them. Just the right amount of sweetness and acidity. They were simple too. Canning seemed kinda intimidating, but not this recipe.  These freezer pickles are the perfect palate cleanser. They are so refreshing.  I can't wait to give a jar to a friend as a small thank you or as a welcome to the neighborhood gift. 


Yay for these pickles and yay for my 3rd Motivate ME Monday! Spring will be here soon which mean delicious fresh veggies. This summer I am definitely going to have to splurge a little on canning supplies and take my Grammy's advice!

What about you? Are you going to be canning this summer? What is your favorite thing to can?


Ingredients

3 large Cucumbers thinly sliced
2 medium Onions thinly sliced
1 Green pepper diced
2 cups sugar
1  cups White vinegar 
1 tbsp Salt
1 teaspoon Celery salt
 *This was not in Grammy's recipe, but I added 1 teaspoon of Red pepper flake to a second batch and it added a nice amount of spice.*

Directions

1. Combine the sugar, vinegar, salt and celery salt in a sauce pot and bring to a boil. Allow to cool.
2 .Pour the vinegar liquid over the cucumber, onions and pepper. Seal in bowl or tubberwear container. Place in the fridge for 24 hours.
3. Pour an equal amount into 6 small mason jars. Seal and place in the freezer. Allow to freeze.
4. When you are ready to eat, allow to thaw in the fridge!
                                                           

Oh and a little help, if you please....Stop on over to the Always Savory Facebook page and give it a like!

Friday, April 25, 2014

White Wine & Artichoke Chicken

This next recipe has been a craving of mine for over a week now!


Mmmmm! Chicken, artichoke, white wine and parm cheese is always a great combination! The sun dried tomatoes and asparagus gave this dish great added flavor. And both were in my fridge so I thought what the heck throw them in there!


My craving was crushed! I was so pleased with how the dish turned out! Another awesome achievement for me with this dish was the pictures! I got a new camera for Christmas and I have been non-stop playing and learning about photography. I have been trying to figure out a place, with good lighting to take my pictures. I think I have found that place! ( my amazing neighbors have a much better back yard then I do) With a little more work, my pictures will soon be on their way to incredible!


So what are you craving?

Ingredients
4 thin sliced Chicken breast
1 14oz can Artichoke hearts
1/4 cup Sun dried Tomatoes 
1 cup Parm Cheese 
1 cup dry White Wine ( like a Pinot Gris or Savignon Blanc)
A handful of chopped Asparagus
1 tbsp minced Garlic
1 tbsp Olive oil
1 teaspoon Flour
2 tbsp Butter 
1 box Angel hair pasta
S & P
Directions
  1. Cook pasta according to directions on the box.
  2. Meanwhile, saute garlic in olive oil until brown.
  3. Brown the chicken on both sides. Then transfer to a plate. About 3 mins a side.
  4. In the same saute pan add artichoke hearts, sun dried tomatoes, and asparagus. Cook until asparagus is bright green. About 5 mins.
  5. Add 1/2 cup of parm cheese and white wine. Allow to boil.
  6. Add chicken back to saute pan and cover. Allow chicken to cook, about 10 mins.
  7. Remove chicken and stain liquid and set aside. Keep chicken and the fixings warm.
  8. Add the liquid back to the pan. Add flour and butter. Mix until butter is melted and flour is incorporated. Allow your liquid to reduce.
  9. Once your liquid is almost reduce to half, add another 1/2 cup of parm cheese and S&P to taste. Allow liquid to thicken.
  10. Server over angel hair pasta.


Notes: While the pasta is hot I like to add parm cheese and olive oil!


Thursday, January 30, 2014

Chicken and Winter Vegetable Pot Pie


One of my favorite dishes that my grandmother makes is her homemade chicken pot pie. In South Jersey, where I am originally from, we make our chicken pot pie a little differently! Chicken pot pie as I know it, is not really a pie at all! It would better be described as chicken and dumplings, but the dumplings are rolled out thin and there is no veggies. Mmmmm! Grandma's chicken pot pie is the best and with all this winter weather we are having, it would surly hit the spot, but for this chicken pot recipe I decided to venture out on my own. I went with something that I thought would be really yummy. I wanted something hearty and something with winter veggies. 


This chicken and winter vegetable pot pie was so yummy and very satisfying to make. Sometimes when I look at recipes and see that they have a lot of steps I can get intimidated. I want cooking to be fun and relaxing and long complicated recipes are not always relaxing for me. At first this recipe seemed like there was a lot to it, but once I got in the kitchen I realized how enjoyable it was to go through the process of making a pot pie.
There was one part of this recipe that I didn't particularly enjoy and that was making the pie crust. I have never had any luck making pie dough! So for this recipe I thought that I give myself a break and buy the box mix. Well I even had issues playing with that pie dough (I'm sure it was me not the box mix). I'm not sure what it is about me and pie dough, but we don't get along. I don't even know what I am doing wrong. My problem always arises when I am rolling out the dough. For some reason I can never seem to roll it out even or transfer it from my floured surface to my pie plate. Don't even ask me to try to make pretty decorative edges on my pies. LOL My pies always taste better then they look!


After I made this recipe I called my grandma to tell her all about it. She wants me to make her one the next time I am home. The next time I want a chicken pot pie, I am gonna have to make my grandma's version. Both are so delicious and both can be a tradition in my home.


Hey before you go!!! What is your favorite pot pie recipe? Have any tips to help me with my pie dough skills?

Ingredients
3 or 4 Chicken breasts with skin and bones
6 cups of Chicken Stock
2 large Carrots
1 or 2 Turnips
1 bunch of Turnip greens
3 med size Leeks
1 Shallot
1/2 cup Flour
1/2 stick Butter 
1/2 cup dry white wine
1/2 cup whipping Cream
1 box pie Crust mix ( or if you are better at it then me! A homemade herb pie crust would go great!)
S&P
Directions

  1. In a large pot or dutch oven place the chicken and just enough stock to cover and set to boil. Once it has boiled, reduce to a simmer and cover. Cook the chicken until just cooked, about 20 mins. Remove the chicken and set aside to cool. Don't dump your stock yet, it will still come in handy!
  2. While the chicken is cooking, peal and dice your carrots and turnips. Once the chicken is cooling, add your carrots and turnips to the stock. Simmer until tender about 10 mins. Using a slotted spoon, transfer the veggies to a bowl. 
  3. Now add your turnip greens to the stock and cook until wilted. Once wilted, transfer to a colander and drain. Once greens are drained add to the bowl of veggies.
  4. Strain the stock and keep 4 cups. Don't wash the pot yet, you will use it again in a few steps.
  5. Remove the skin and bones from the cooled off chicken and dice. Add to your bowl of carrots, turnips and greens. 
  6. Slice the leeks. Only use the white and light green parts. Also mince the shallot.
  7. Melt the butter in the large pot used for the chicken. Add the leeks and shallots. Saute at medium heat until tender. Add in flour. Once your roux forms add in the stock and white wine. Turn the heat up and allow to boil. Add the cream. Allow the gravy to become thick enough to cover the back of a spoon. Pour into your chicken and veggies mixture and allow to cool. Add S&P to taste to your pie filling.
  8. Make your pie crust according to directions on the box. Bake off the bottom of the crust and allow to cool. Add pie filling and lay on the top crust. Place back into your oven at 425* for about 50 mins or until top crust is done and gravy is bubbling. Allow to cool and server warm.  TIP: I placed foil on the top of my pie so that my top crust would not burn. Take it off about 15 mins before your timer goes off.


PS. Do you like this post? If so you should check out Always Savory's Facebook and Pinterest

Wednesday, January 22, 2014

My Spur-Of-The-Moment Dinner


Every time I think of turkey, I think thanksgiving dinner. There are not too many more times during the year that I roast a big turkey.

Thanksgiving turkey is so delicious, but I don't always want that hearty of a meal. So when trying to create a turkey dish I wanted to do something that was not as heavy and didn't give you that over-stuffed feeling. I wanted the cutlets to be juicy and full of flavor. And they were!

For me the best part about making this dish was that it was a spur-of-the-
moment dinner idea. I knew that I wanted to cook up the turkey cutlets, but how? With what? I love standing at my fridge thinking about what I can create. Soy and teriyaki is always a good combination. Once I had my two sauces the rest just came together! 

Some might think that it's kinda scary standing at their fridge and just putting something together. Me, I like the chance to be creative. So what if it doesn't turn out to be the best thing you've ever cooked!? At least you tried and learned something new. 


Before you go and make these savory marinated turkey cutlets, tell me....
What is your favorite spur-of-the-moment dinner dish?

Ingredients
4 Turkey Cutlets
1/3 cup Low-Soduim Soy Sauce
1/4 cup Teriyaki Sauce 
1 teaspoon Honey
1 teaspoon minced Garlic
Few dashes of Sriracha (optional)
1/2 tbs Olive Oil
1/2 tbs Flour
S&P
Directions

  1. Season the turkey cutlets with S&P.
  2. In a bowl, combine the soy, teriyaki, honey, garlic and Sriracha. Whisk until you don't feel the honey sticking to the bottom of the bowl.
  3. Place seasoned cutlets into the bowl and refrigerate for 30 mins.
  4. In a saute pan, add the olive oil, and heat for one minute. Add the turkey and the marinade to saute pan. Saute the cutlets in the marinade until done. Once finished place cutlets on plate.
  5. Whisk flour into marinade. Allow to simmer and thicken for about 3 mins. Serve as a sauce.

PS: Please don't forget to Like Always Savory on Facebook and Pinterest!

Tuesday, January 21, 2014

Red Wine Pot Roast


Let me be honest for a second; I have never made or tasted a pot roast before making this recipe. I am not a big red meat eater and I always assumed that I would not like it, so I never tried it.


We eat a lot of poultry in our house and I wanted to spice things up a bit. I have been talking about cooking up a pot roast for over a month. I got excited to make my pot roast. I enjoy cooking traditional meals. There is something about a traditional meal that makes you feel at home.

When it came to making my first pot roast I broke out my crock pot. I love using my crock pot. It makes cooking effortless and clean up a snap! My prep for this dish only took me 15 mins and then my crock pot did the rest.

While my roast was cooking all I could smell was the red wine. It made me a little nervous, but I was pleasantly surprised with the results. The Merlot added a great flavor to the meat, carrots, and potatoes. One thing that I would do differently if making the same pot roast recipe is setting it on low for 8 hrs. I was running late and I had it on high for 4 hrs. All in all I say my first experience cooking a pot roast went well. I am excited to see how I can change things up for my next one!


I love cooking traditional meals and this pot roast was right up my ally, but tell me....
 What is your favorite traditional meal to prepare?

Ingredients 
8 lbs Roast
1 bottle of Merlot
1 26oz container Beef Stock
6 Red Potatoes 
4 Large Carrots
S& P

Directions

Season the roast with salt & pepper. Cut your red potatoes into half and then half again. Peel and cut carrots. Add the roast, potatoes and carrots to crock pot. Pour beef stock and Merlot over meat. Make sure to cover the meat completely with liquid. You can always add a little water if you need to. Set crock pot on low for 8 hrs or high for 4 hrs. Once meat is done, let stand for 10 min. Cut and server with potatoes and carrots.

Monday, November 11, 2013

Chicken Stuffed Broccoli & Swiss Cheese

I love stuffing chicken with yummy ingredients!!


I have bought those chicken stuffed with broccoli and cheese in the freezer isle. They can be pretty expensive. So I decided to just make them myself. When things are homemade they always taste better and you can make the recipe the way you would want to eat it!


I like mine with Swiss cheese and broccoli. They could always be made ham, asparagus, stuffing or Swiss chard! Any one of those ingredients with cheese would make a great dinner. 


Another awesome thing about making these at home is that they don't take too much time. The prep time took me about 30 mins! That means a yummy dinner in under an hour! 


I made these while on vacation at my Mom's. Everyone really loved them. The melted Swiss cheese worked very well with the broccoli and the chicken was juicy. My family is very picky eaters and if this can satisfied them, then it can satisfied anyone.


The next time I make these I will try to use chicken cutlets, instead of chicken breast. That will cut my prep time in half. My husband loves asparagus. An asparagus and Gruyere cheese combination will be on our dinner table in the near future. I did make one mistake when making these though. I didn't cut my broccoli up enough. If my broccoli was smaller I could of stuffed the chicken a little easier and added more cheese. There can always be more cheese!! I can't wait to see where this recipe takes me!! The combinations are endless!

What creative chicken stuffed combination is your favorite?
Ingredients
3 large Chicken breast
1 large Egg
1 cup Breadcrumbs
6 slices of Swiss Cheese
2 cups Broccoli
1 tblsp room temp Butter
Salt & Pepper
Toothpicks
Directions
  1. Pre- heat oven to 350*. Thinly slice chicken breast and chop the broccoli in to small bits.
  2. Set up an assembly line starting with the chicken breast. Brush each piece of chicken with butter. Lay a piece of cheese and broccoli bits onto one piece of the butter chicken. Roll the chicken and secure it with a toothpick. Dip the chicken into the egg and then the breadcrumbs. Shake off any extra breadcrumbs and place on a lined baking sheet. Continue until all the chicken is stuffed. Cook for 25 mins. Let stand for 5 mins and serve.

Monday, November 4, 2013

Turkey & Bacon Chili

If you like turkey, bacon & beer then you will love this chili!


Well the Always Savory kitchen has been temporarily moved to Jersey! I am here on vacation from my current home state of Virginia to visit family. My family was super excited when I told them I was going to be creating a food blog. So while I am up here, I had to cook something for them!


The first thing I notice about being in Jersey is that the weather is much much colder then V.A. My parents have been saying that I brought the cold weather with me. LOL! Due to the cold weather chili just made since. The other thing that I noticed was working in someone else's kitchen is not that easy. I am so use to my kitchen and my equipment.  It took me a few minutes to navigate my mom's kitchen.


The best part about this chili, I think, is the bacon! Everyone loves bacon! The crisp bacon adds a nice crunch and great flavor. The original recipe calls for ground beef, but my family is not big red meat eaters. Turkey instead of beef is a great lean option that tastes great! Some of my family members can be picky eaters, but that's ok. I never back down from a picky eater! My picky eaters didn't want the beans. So I decided to make a side of rice. We poured the chili over the rice. Yum Yum! When it comes to chili, I say the spicier the better, but this recipe has a nice balance. Chili is a hearty dish that is great alone or on nachos. I am sure that during the cold winter months this chili will be on my stove again!


But before we go, you have to tell me what are your favorite toppings on chili?
Ingredients
2.5 lbs of ground Turkey
9 slices of thick cut Bacon
1 large chopped Onion
1 large chopped Green Pepper
2 tbsp of minced Garlic
1/4 cup Chili Powder
1/2 tbsp Cumin
2 teaspoons Paprika
2 teaspoons Oregano
2 tbsp unsweetened Cocoa Powder 
1 small can Tomato Paste
1 bottle Amber Beer, like Fat Tire Amber Ale
1 28 oz can Rotel Diced Tomatoes & Green Chilies
1 1/2 cups Beef Stock
2 cups White Rice
1 tbsp Hot Sauce 
Salt & Pepper
Shredded cheese & Sour Cream for topping

Directions

  1.  In a skillet cook bacon until crisp over med heat. Drain on a paper towel and let cool. Scrap and save the bacon drippings, set aside.
  2. In the same skillet cook the turkey. Add about a tbsp of the bacon grease to turkey. As turkey is cooking season with S&P. When turkey is done set aside.
  3. In a large sauce pan over med heat add bacon drippings, onion and green pepper. Cook until onion is translucent. Once onions are done add garlic and cook for about 3 mins.
  4. To the saucepan add chili powder, paprika, cumin, oregano and tomato paste. Fill up half of the tomato paste can with water and add to the sauce pan. Cook until tomato paste is brown. 
  5. Add the beer and reduce to half.
  6. Add turkey,bacon and cocoa powder. Stir to coat the meat.
  7. Pour tomatoes, green chilies, & beef stock into saucepan and bring to a simmer. Simmer for a hour and half or until chili is thick, stirring from time to time.
  8. When chili is done add hot sauce and stir. Let cool. Pour over rice and top with shredded cheese and sour cream.
Notes: If you like beans in your chili you could use 2 15 oz cans of black beans, instead of the rice.  You would add the beans in step 7.


Tuesday, October 29, 2013

Cheddar Broccoli Bites

My mom always said eat your greens!


My mom is the inspiration behind today's post. She has been asking me to make these for weeks. Whenever we go out to eat and broccoli bites are on the menu my mom is sure to order them.


In my household we have broccoli on a very regular bases. I love making this healthy veggies something that everyone can enjoy. Broccoli can be hard to get your children to eat, but these yummy bites-size snacks will be a hit!


 I love working in my kitchen, but I hate cleaning up the mess. For this recipe I only used a bowl, a measuring cup, and a baking sheet! What is better then an easy kitchen clean up? This recipe was so easy, the prep for it only took me 10 mins. I have a 5 month old daughter and any recipe that is this fast to make and easy to clean up is something that will go right to the top of my recipe box.


These cheddar broccoli bites were my lunch today and oh man did they hit the spot! They had an awesome crunch. I served mine with ranch dressing. The dressing went well with the crispy crunch and the yummy cheddar cheese. My hubby is deployed right now, so I put some in the freezer for when he comes home.  He will love them! I think when I make them for him I will try frying some instead of baking them. No one has to force me to eat my green, but these cheddar broccoli bites make it even tastier!


But before we go, tell me your favorite green veggie to eat?
Ingredients
1 cup Broccoli
1 cup shredded Cheddar Cheese
1/2 cup Parmesan Cheese
1 cup Flour
1/2 Bread Crumbs
4 Eggs
Salt & Pepper to taste
Directions
  1. Pre-heat your oven to 375*. In a large bowl combine all the ingredients.
  2. Form the broccoli into balls. Place on a lined, greased baking sheet. Bake for 25-30 mins or until bites are browned.


Related Posts Plugin for WordPress, Blogger...

ShareThis